When buying a new phone the first thing you will need to do once getting it home is setting it up. But if you have never set up a phone before you may be worried about the process. It is not that hard and it is actually quite quick and easy to do. In this article I will be talking about how to set up a new phone and what to do afterwards so you will know how to set up your new phone.
Setting Up Your New Phone- What To Expect
When you buy your new phone it is an exciting time and you will want to start using it straight away. But it’s important to take the time to get it ready for use.
What’s Included?
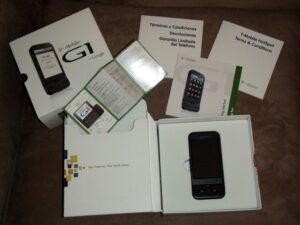
You will get a few things in the box with your phone which is just some basic accessories that all phones need to have. Your phone will come with a USB cable and adaptor which is used for charging the device and other included accessories can include earphones, SIM ejection tool and sometimes a rubber case.
You will also have some documentation in the box which will include a quick start guide, warranty card, safety information and sometimes a user manual as well. Make sure you keep everything safe and remember where it is in case you ever need it.
Unboxing
The first thing you do once you get it home is the unboxing. So start by opening the box, removing the phone and everything else included from the box and remove all the packaging.
After that make sure everything that is meant to be in the box is there. Take a look at the box or manual to find a list of what is meant be in the box and then make sure it has all been included.
The next step is to insert the SIM card and the battery into the back of your phone if it’s not already in there. After they are both in your phone put the back cover on it and your phone is assembled and ready for the next step. The last thing you need to do before you can start setting up and using your new phone is charge the battery.
Most phones come with some charge on them which is usually around 25% to 50% which is enough to complete the initial setup wizard. But it’s a good idea to charge it first so you can finish everything without running out of battery. So connect the phone to the charger and let it fully charge. Once it’s done you are ready to start setting it up and using it.
Understanding The Setup Process
Setting up your new phone is one of the first things you do with it once you have purchased it. It may seem hard or like a daunting task but setting up a phone is not that hard. But it is important to set up your new phone correctly so you can use it easily, safely and securely.
The setup process begins with the initial setup wizard which sets up the basic setting for your phone like the language, date and time, internet settings and much more. After that you will be able to personalize your phone, customize settings and install apps and updates.
The last part of setting up your new phone is setting up the security features to keep your device safe. Once you have done that you are ready to use and enjoy your new phone. All of this will be covered in this article so you will be able to get your new phone up and running in no time.
How To Set Up A New Phone
Once you have unboxed and charged your new phone you are ready to set it up. It won’t take too long but you will need to set aside around 30 minutes to set up the essential things. The setup process begins with the initial setup wizard which can be configured in about 5 to 10 minutes.
Navigating The Initial Setup Wizard
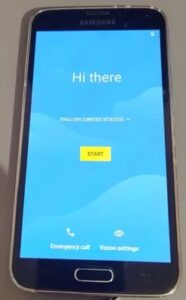
The initial setup wizard is the first thing you will see when you turn your new phone on for the first time. You will see a greeting screen that says something like hello or how are you? Tap the next button to continue.
Now you will be asked to select a language which is as simple as selecting the language you want from the listing and then tapping next. You will also be asked to select a keyboard language and layout so make sure to select the ones you want while you are at it.
The next step is to set the time and date and you can select the automatically which is the easiest way to do it. This option will detect the time and date from your phone carrier and set it for you. You may still need to select your country and time zone though.
Adding Accounts & Networks
After that you will be asked to connect to a WiFi network which is not necessary to continue. But you might as well add your WiFi connection while you’re on this screen if you have one. If you don’t want to tap skip for now and you will be able to continue. The next thing you will see is the accounts screen where you can add your Google account or Apple ID to your phone depending on the type of phone you have bought.
This can also be skipped and done later but it’s best to do it now and get it over and done with. If you do want to skip it just tap skip for now and you will be able to continue. You are now approaching the end of the initial setup wizard and may be asked to wait for a couple of minutes for your phone to get itself ready.
You will also need to agree to some terms and conditions and then you should be taken to the lock screen or home screen. Once you get to the lock screen or home screen you have completed the initial setup wizard and your phone is ready to use. But there is more to do to improve the safety and usability of your phone so you should now move on to personalizing and customizing your new phone.
Personalizing & Customizing A New Phone
Now that you have completed the initial setup wizard the next thing you should do is personalize and customize your phone. This will help you by improving the usability of your phone and will set your phone up how you like it.
There is a difference between personalization and customization of your phone. Personalization means doing things like choosing your themes and wallpapers, setting a passcode and other similar things. Customization means setting up different settings on your phone to your preference such as sounds, display settings and notification settings.
Changing The Theme & Wallpaper
Now that you understand the differences you are ready to get started. Start with personalization and begin by choosing theme and change the wallpaper if you want to. To do this you will need to find these settings on your phone.
Here’s how to change the theme
- Go to settings
- Go to display settings
- Tap the dark theme or light theme
- Make sure it is turned on
- Tap the back button a few times or press the home icon to exit to the home screen
Here’s how to change the wallpaper
- Go to settings
- Go to display settings
- Tap wallpaper
- Tap wallpapers
- Browse the wallpapers that are available and choose the one you like
- Tap confirm to save your changes
- Tap the back button a few times or press the home icon to exit to the home screen
If you don’t like any of the wallpapers available on your phone you can use a photo instead. To that follow the same steps but taps photos instead while you’re in the wallpaper settings. Once you’re in photos tap the photo your want to use and then tap confirm to save your changes. Exit to the home screen in the same described above.
Setting A Passcode & Other Screen Lock Features
Now that you have set your theme and wallpaper it’s impotent to set up a passcode or other screen lock to keep your phone safe. This will stop other people from accessing your files and data on your phone if it is lost or stolen. This is also good for other times to stop friends and family from looking through your phone.
It easy to set up a passcode which is a PIN for your phone and if you don’t want to PIN you may be able to set up something else instead. Some phones will allow you to set up a pattern or stronger security like Face ID or fingerprint ID. You can see what options you have in the settings on your phone.
Here’s how to set up a passcode
- Go to settings
- Tap security
- Tap screen lock
- Choose the option you want and set it up
- Renter your screen lock to confirm it
- Press the back button a few times or tap the home icon to exit to the home screen
If your phone has Face ID or Fingerprint lock you can set this up in the same way. You will it in the security settings underneath the screen lock settings. If you set up Face ID or Fingerprint lock this will be your extra layer of security and will be used as well as your passcode or password to secure your phone even more.
Customizing Settings
Now that you are finished with personalization it is a good idea to do some customization with some of the settings on your phone. It’s not hard to do and it doesn’t take long either meaning it should be easy for you to do. The main three things you should customize are display, sounds and notification settings as they should be set up how you like them.
The Display Settings
The display settings include things like brightness, night mode and video display as well as advanced settings. The advanced display settings include things like screen timeout, screensavers, colors, font size, display size and a few other settings. These can all be found in the display settings which can be accessed from your phone settings in the same way I described earlier on.
Make sure you confirm all your settings if you are asked to so your changes will be saved and don’t change anything you don’t understand. If you come across something you don’t understand you need to find out what it is by looking it up or asking someone before you change or configure it.
This is so you don’t change anything important or cause any unwanted changes to your phone. It’s better to not change something you don’t understand then have to try to figure out to fix an unwanted change instead. But for the most part you should be fine and should be able to customizes your display settings without too much trouble.
Sounds & Ringtone Settings
Sounds and ringtones are an important part of your phone and are easy to customize from your phone’s settings. Sound settings include the volume settings for things like ring volume, media volume and alarm volume as well as vibration and do not disturb settings.
You will also find settings for things like dial pad tones, screen lock sounds and power on and off sounds. The ringtone settings include the tones you want for when you receive calls as well as tone for notifications and alarms on your phone. All of these different settings can be configured in the sounds menu in your phone’s settings.
Here’s how to change your sounds settings
- Go to settings
- Go to sounds
- Adjust the sliders for call, notification, media and alarm volume
- Choose whether or not you want to your phone to vibrate or not
- Turn do not disturb mode on or off
- Configure the settings for dial pad tones, screen lock sounds, power on and off sounds and any other sounds you want to configure
- Press the back button a few times or tap the home icon to exit to the home screen
Here’s how to change your ringtone settings
- Go to settings
- Go to sounds
- Tap ringtone
- Tap each ringtone to listen to them
- Select the one you want
- Press ok to confirm your selection
- Repeat the process for the notification tones and alarm tones
- Press the back button a few times or tap the home icon to exit to the home screen
Once you have set up your sound and ringtone settings to your preferences you want have to change them again unless you want to or if you reset your phone. If you do need to change them again you can do at any time by following the same process described above.
Notification Settings
Notifications pop up on your screen like text messages but come from the applications on your phone. Each application your phone will send you notifications from time to time. It will include things like reminders, updates and things going on inside the apps
. But this can get annoying and some apps like social media apps send notifications all the time. Notifications for all apps are turned on by default but this can be changed in your phone’s settings.
Here’s how to change your notification settings
- Go to settings
- Go to apps and notifications
- Tap see all apps
- Tap the app you want to change notification settings for
- Configure the types of notifications you want to receive from the app or select the option to turn notifications off for that app altogether
- Repeat the process for each app you want to change notification settings for
- Press the back button a few times or tap the home icon to exit to the home screen
You can also choose to hide notifications from the lock screen which can be done from the notifications settings. Look for this option while you are in the apps and notification settings menu that I described above. Once you have done all of these things you are done with personalization and customization but there are still a few more things to set up on your phone. The next thing you should set up is your phone’s apps and updates.
How To Set Up A New Phone’s Apps & Updates
Now that you have finished with personalization and customization it’s time to move on to your phone’s apps and updates. There are many apps that will be preinstalled on your phone and your phone will want to install some automatically to finish setting up your phone.
You should allow this and sometimes these apps will update automatically to as they are installing so you won’t need to update them straight away. Once this is done you can start thinking about what apps you want to install on your phone. This should be based on your needs and includes social media apps. Once you have decided go ahead and download them from the app store.
This is the time you need to add your Google account or Apple ID to your phone if you haven’t done it already as you will need it to access and use the app store. Once you have all the apps you want downloaded and installed you are ready to get everything up to date.
Updating Apps
Keeping your apps and the operating system up to date is important because it will allow you to use the latest features but also keep your apps and device secure and running smoothly.
Sometimes apps will update automatically if you allow them but most of the time you will just get a notification let you know updates are available.
Now you need to update all of your apps and you should start with the preinstalled ones if they are not up to date already. Once they are done update all other apps that you have downloaded on your phone and make sure you don’t miss any.
Updating your apps is done through the app store so go there and then go to the settings and update all of your apps through there. Once you are done it’s time to update the operating system as this is important to.
Updating The Operating System
Updating your operating system is important for your phone and will give you the latest features and security for your device. Updates are released by your phone’s manufacturer and new ones come out periodically so be sure to look out for them. But when you first get your phone you will need to check for and install the latest updates to get your phone up to date.
Updating the operating system is not hard and doesn’t take long to do so expect it to take around 10 to 30 minutes depending on the size of the update and your internet speeds.
Here’s how to update the operating system
- Go to settings
- Go to system updates
- Tap check for updates
- Wait a couple of minute for it to check for updates
- If updates are available tap download
- Wait for the updates to download
- Tap install
- Your phone will restart and the updates will be installed
- Once your phone restarts wait a few minutes for the updates to finish
- Repeat the process for all updates that are available
You can also turn on automatic updates in the settings which is found in the software updates menu that I described above. You can configure how often you want it to check for updates and then your phone will automatically find and download available updates regularly.
But you can leave this option turned off if you want to do it manually. Sometimes you may get a notification when updates are available but you should check for updates often to make sure your phone is up to date.
Setting Up Email & Social Media Accounts
Now that your phone is up to date and you have all the apps you want installed it is time to setup email and social media accounts. This is quick and easy to so don’t worry you will only need a few minutes to do this.
Start by downloading and installing the email app you need if you don’t already have it and then simply sign in to and you will access to your email. Next you just have to sign into the social media apps you have on your phone and they will be ready to use. If you want to use any that are not on your phone just go to the app store and then download them, install them and sign in.
Be aware that you will need to enter a code for each social media account when you sign into your new phone for the first time. This is a part of the security measures on your social media accounts and it verifies that it is you signing into your social media accounts.
So make sure you do this as well and once you done it for all of your social media accounts you will be good to go and your social media accounts will be ready to use.
App Permissions & Data Privacy
All of the apps on your phone have different permissions and can access your data and different things on your phone. Some apps have access to your calls, messages and contacts while some apps only have access to your location or calendar. This is something you need to take the time to look at and configure because a lot of apps don’t need all the permissions they want to have.
So turn off any permissions that are not necessary for each of your apps and take a look at other privacy settings while you are at it. There are other privacy settings you need to configure as well which are whether or to show passwords as you type, Autofill settings for Google, notifications privacy for the lock screen, ads personalization settings and a couple of others.
These are all very important settings that you should not miss or overlook as they will help you control your data and information on your phone. App permissions and other privacy settings are easily configured in your phone’s settings.
Here’s how to change your app permissions
- Go to settings
- Go to privacy
- Tap app permissions
- Tap each option one by one to see a list of apps that have that permission
- Tap allow or don’t allow for each app with each permission
- Tapp ok for each one to save your changes
- Press the back button a few times or tap the home icon to exit to the home screen
You can also choose to remove all permissions for unused apps automatically which is an option found in the app permissions menu described above. All other privacy settings that I mentioned are found in the privacy menu underneath the app permissions option. So make sure to configure all the privacy settings while you are at it and get help with anything you don’t understand.
Now that you are finished setting up your phone’s updates and apps you are ready to move on. There are still a few last things to do with your phone before you are finished setting it up which is all about setting up your phone securely.
How To Set Up A New Phone Securely

When you have bought a new phone it’s important to take a few security measures to keep your phone and data safe. Failing do so could result in hacks and unauthorized access to your phone which therefore will result in possible viruses, malware, stolen data and even worse identity theft.
The risk of something like this happening is quite high these days but can minimized or avoided if you take the right security measures to keep your phone safe and secure. The first thing you should do if you have done it already is set up a PIN, passcode or any type of lock screen security your phone supports.
This will prevent anyone that gets a hold of your phone from accessing it and your data.
Setting Up Find My Device
Once you have done that it is a good idea to turn on and set up find my device. A lot of phones have this feature now days and it allows you track your phone’s location if it is ever lost or stolen.
If you have an android phone you can set up and easily manage find my device through your Google account on your phone.
Here’s how to do that
- Go to your phone settings
- Go to the Google settings
- Tap find my device
- Use the links there to either download the find my device app or access the find my device web interface on your phone’s web browser
- Turn on find my device and configure any required settings
Now that you have find my device set up you won’t have to do it again and if you ever loose your phone you can track it though find my device on another or through your computer.
If you have an iPhone you will a similar feature but it is called find my iPhone and it managed through your Apple account. It will also allow you to track your phone and see it’s location like find my device does on android. You will need to set it up through your phone’s setting before you can use it’s features.
Here’s how to do that
- Go to settings
- Tap your name
- Tap Find My Device
- Tap Find My iPhone
- Tap the slider to turn on Find My iPhone
- From here you can also share your location with friends and family, send your device’s last location to Apple and turn on Find My Network which will allow you to see your phone even when it’s offline
- Configure any other settings required for Find My iPhone before you exit the settings app
After doing this you will be able to track your iPhone from any other apple device including another iPhone, iPad, MacBook or Mac desktop computer.
Setting up your phone to be able to track it is not something you have to do but it is a useful feature to take the time to set up. It could save your device or life one day and will also give you some peace of mind.
Backing Up & Restoring Data
Backing up your data is another important security measure that you need to consider in case your phone breaks or something else happens to it that causes you to loose all of your data. Luckily this can easily be done not matter if you have an Android phone or an iPhone.
For an Android phone you can do this easily through the backup options that you will find in your phone settings. You can also backup your photos and videos through the Google Photos app on your phone which is usually enabled by default.
For everything else you backup through your phone’s backup settings it will use cloud storage which is usually Google Drive. Keep in mind that you get 15GB storage for free with Google Drive and if you will need get a paid plan if you need more storage space.
If you have an iPhone you can backup your phone in a similar but it will be done through Apple’s cloud storage which is called iCloud. It is found in your phone’s settings and works in a similar way to Google Drive for Android. With iCloud you get 5GB storage for free and you will need to get a paid plan if you need more storage space.
Keep in mind that you can use other apps to backup your data on your phone if you don’t want to use Google Drive or iCloud. You can also connect your phone to your computer and backup all of your files on your computer for extra security.
As for restoring your phone it is easy to and you do it in the same way as backing it up but you choose restore instead of backup. If you have your files backed up to your computer it is as simple as connecting your phone to your computer and transferring your files back on to your phone. If you get a new phone you can easily transfer your data to your new phone using the same methods.
Using the backup and restore features on your phone is optional but I highly recommend you keep your data backed up in case of emergencies or other problems that could cause you to loose all of your data. Don’t wait for something to happen before you start backing up your data. Do it now and prevent yourself pain and frustration if and when data loss issues happen.
The Importance Of Regular Updates
Keeping your phone up to date is another crucial and important security aspect that you need to keep an eye. It is very important that your phone is always up to date and an outdated phone is vulnerable to hackers and also viruses and malware attacks as well as an easier target for identity theft.
To keep your phone more secure and keep your data safer make sure your device is always up to date. This will also give you access to new features that are available for your phone. Manufacturers release security updates and feature updates as well as patches and bug fixes. So make sure to get every update that is available for your phone so you don’t miss out on anything important or interesting.
It is quick and easy to update your phone meaning anyone can do it no matter their skills or if they are tech savvy or not. Updating your phone is a simple as going to your phone settings, tapping software update and then selecting check for updates.
After that it will download and install any updates it finds so make sure to do this regularly. You may also need to restart your phone to complete the update and this is perfectly normal so make sure to do that to if it asks you to.
Some phones will even find new updates automatically and notify you when they are available. You can then download and install them when you are ready which you should do as soon as possible. It is also possible on most phones to enable automatic updates in the settings which will download and install updates automatically each time there is new updates available for your phone.
So make sure to keep an eye out for new updates for your phone and keep it up to date all times. Not only are your protecting the security of your date and device you are also getting access to the latest features that are available for your phone.
Now that you know about phone security and have set up your phone as securely as possible you are pretty much done with setting up your new phone. But there is still a couple of other things you need to know to get the most out of your new phone.
How To Make The Most Of Your New Phone
Now that you have ser up your new phone it’s important you get the most out of it. There is a lot you can do with your phone and knowing a few other important things will make sure you get the best out of your new device.
Advanced Features & Customization
Aside from all the usual settings your phone will have some advanced features and settings that you can customize if you want to. All phones have accessibility options where you can make text bigger, use a narrator feature and much more. Your phone also allows you to customize the date and time manually if you ever need to do that.
Your phone also has developer options which lets you use advanced settings to customize your phone even more. But don’t use them unless you know what you are doing because you can harm your phone if do something wrong within those options.
iPhones also have similar advanced features and settings as well as developer options that you can customize. But always make sure you know what you are doing and understand what changes you are making before you make any tweaks or adjustments so you don’t cause any harm to your device.
Battery Maintenance & Longevity
Your battery is an important part of your phone and batteries usually last a while if looked after properly. It is important you know and understand what to do to avoid damaging your phone’s battery so you can increase it’s longevity and performance. There are a few things you can do to maximize the longevity and performance of your phone’s battery.
Here are a few tips to get the most out of your phone’s battery
- Set your phone to turn the screen off when it’s not in use
- Reduce the brightness of the screen and don’t have it too high
- Disable any keypad lights and vibrations in your phone settings
- Charge your battery before it goes flat
- Don’t overcharge your phone
- Turn on battery saver or power saving mode
- Use a darker theme to reduce battery usage
- Avoid exposure to extremely hot or cold temperatures
- Avoid using fast charging unless it is really necessary
- Try not to use your phone while it’s charging
- Only use the charger that came with your phone
- Partially charge the battery before storing your phone long term
- Always keep your phone up to date
If you follow the above tips you will be able to get the most out of your phone’s battery. Once your battery starts to degrade a lot of and isn’t lasting long on full charge it’s time to get a new battery for your phone. But if be careful with your phone’s battery and maintain it right you shouldn’t have any problems with your phone’s battery for a long time.
Knowing About Warranty & Support
Most phones come with warranty and there is usually support available for most phones from the manufacturer. Usually a phone comes with 6 to 12 months warranty and you can find out if your phone came with warranty by look at the box and documentation that came with your phone.
A better thing to do is check before you buy a phone to see if it comes with warranty. It’s good to have warranty with your phone so you can get it repaired or replaced if something goes wrong with it that wasn’t your fault during the warranty period. When it comes to support it is also good to know your options if you have questions or need any help with your phone.
If you buy from a popular and well known brand you can usually get help online or over the phone directly from the manufacturer. You can also get support from the place you bought your phone if you need help shortly after purchasing it. But getting support direct from the manufacturer can be done at any time no matter how long you have had your phone for.
On some phones you even have built in apps for support or information in the settings about how to contact the manufacturer for help. You are always welcome to get free support for your phone through my website by leaving a comment or reaching out through email.
But make sure you familiarize yourself with warranty and support so you know exactly what to do if something goes wrong if you have any questions about your new phone. Once you have done that you will be ready for anything and you can have fun with your new phone.
Conclusion
In conclusion setting up a new phone can seem like a daunting task but it doesn’t have to be overwhelming. It’s not scary or hard to do and it can be done quite quickly once you know what to do. The basic setup process for a phone is similar regardless of the phone you have. You begin by unboxing your phone, making sure you got everything that was meant to come with it and going through the initial set up wizard.
After that you need to take the time to customize and personalize your new phone, add accounts and networks, install updates and set up security features. Once you have done that all that is left to do is make any advanced customizations to your phone that you want, maintain your battery and familiarize yourself with warranty and support for your phone.
Make sure you take time to set up your phone properly to make sure it is as safe and secure as possible. Always keep it up to date so you can avoid any security risks like viruses, malware and identity theft and most of all have fun with your new phone. Don’t be afraid to explore your new phone and I encourage you to keep learning about your device so you can discover new things about it.
The sky is the limit with your new phone and having fun while staying safe and productive is the best way to be. Thank you for reading. I hope that you enjoyed this article about how to set up a new phone. If you have any questions or if you need any help let me know in the comments.